Preface
The goal of this tutorial series is to allow the reader to start deploying on Kubernetes with a basic understanding of Kubernetes architectural principles. We assume zero previous knowledge about Kubernetes, the only prerequisite being a knowledge of what containers are and how they work. I recommend that you read the sections in the order they are presented, because some sections build on concepts explained in the previous ones. This tutorial is not short, but it should give you a solid understanding to start deploying working applications on Kubernetes.
This tutorial series is essentially what I would have wanted to read when I first approached Kubernetes, instead of searching and reading lots of different sources. It is complete in the sense that covers all the basics. More advanced topics like RBAC, custom resource definitions, operators, etc. are not discussed. This series is not meant to sell you Kubernetes: we will not compare it to the alternatives or dive deeply into its benefits. However, if you are curious and want to start deploying and orchestrating containers with Kubernetes, this series is for you. The first part will only cover some theory, and then we’ll dive into a practical example. This is the structure of the series:
- Part I: Kubernetes basic concepts (this post)
- Part II: A practical and realistic example
- Part III: Best practices
Table of contents
Introduction
Kubernetes, which translates from Grek to “pilot” or “helmsman”, is an open-source system for automating deployment, scaling, and managing containerized applications. It was born out of the necessity to automate the deployment and management of containers across all stages of the development cycle. Kubernetes is supported by the CNCF, a foundation created by Google and others to house Kubernetes and other open-source computing projects.
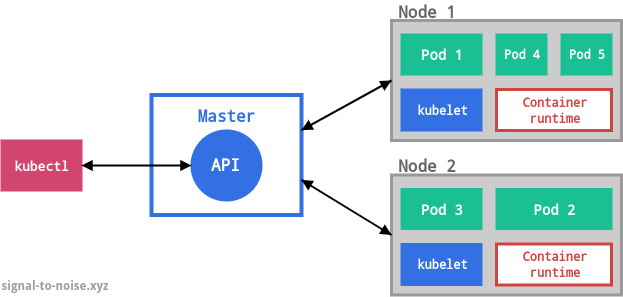
A Kubernetes cluster consists of at least one master and multiple compute nodes. The master is responsible for exposing the application program interface (API), scheduling the deployments and managing the overall cluster. Each node runs a container runtime, like Docker, and an agent that communicates with the master (kubelet). Nodes expose compute, networking and storage resources to applications. They can be virtual machines (VMs) running in a cloud or bare metal servers running within a data center.
To learn how Kubernetes works, there are two related concepts you need to understand:
- Kubernetes implements an object model: everything Kubernetes manages is represented by an object, and you can view and change these objects' attributes and state;
- The second is the principle of declarative management. You can declare the state you want your cluster to be in through manifest files, and Kubernetes will work to bring that state into being and to preserve it. This is why Kubernetes is often described as a desired-state manager.
An object is created by supplying Kubernetes with an object “spec”. With this spec, you define the desired state of the object by providing the characteristics that you want.
The control plane is a term that collectively refers to the system processes that collaborate to make a Kubernetes cluster work. They constantly monitor the state of the cluster, and whenever the current state does not match the desired state, remediation actions are applied. These can include scheduling or unscheduling workloads, for example.
Pods
Each object is of a certain kind. The basic kind is Pod, which represents the smallest deployable unit within Kubernetes. This is often a source of confusion for beginners, who often expect to hear that the smallest Kubernetes object is the container. That’s not the case, because containers need an environment that can execute them. A Pod embodies such an environment, and it can accommodate one or more containers. If there is more than one container in a Pod, they are tightly coupled and share resources including networking and storage.
Kubernetes assigns each Pod a unique IP address. Every container within a Pod shares the network namespace including the IP address and network ports. Containers within the same Pod can communicate through localhost. A Pod can also mount a set of volumes that are shared among its containers.
Objects are defined in YAML manifest files. As an example, this is a minimal YAML manifest with the spec for a Pod that runs nginx:
apiVersion: v1
kind: Pod
metadata:
  name: nginx
spec:
  containers:
  - image: nginx:1.17.5
    name: nginx
    ports:
    - containerPort: 80
Manifest files have certain required fields. The field apiVersion specifies
which API version is used to create the object; the Kubernetes API is
versioned, and this helps to maintain backward compatibility. This file
declares an object of Pod kind, which can be found in version v1. The spec
block defines the container, which in this case is built from the nginx image
and exposes port 80.
When the above manifest is deployed (we’ll see how in part II of this series), the control plane determines that the desired state differs from the current state and schedules a Pod with a container running nginx on port 80 on an available node.
Controller objects
Pods don’t heal or repair themselves and they’re not meant to run forever. They are designed to be ephemeral and disposable. For these reasons, Pods are rarely deployed directly. There are better ways to manage your workloads, especially if you need to deploy multiple copies of the same Pod: instead of using multiple manifest files that define the same Pod object, one can make use of the so-called controller objects. One of the most commonly used ones is the Deployment object.
A Deployment ensures that a defined set of Pods is running at any given time. Within its object specs, you specify how many replica Pods you want, how Pods should run, which containers should run within these Pods, and which volume should be mounted. Based on these templates, controllers maintain the Pods desired state within a cluster. Under the hood, a Deployment manages a lower-level controller object, called ReplicaSet, which ensures that multiple replicas of a Pod, all identical to one another, are running at the same time. This allows Deployments to perform a rolling upgrade of the Pods it manages. To perform the upgrade, the Deployment object will create a second ReplicaSet object, and then increase the number of (upgraded) Pods in the second ReplicaSet while it decreases the number in the first ReplicaSet.
This is how a Deployment manifest file looks like:
apiVersion: apps/v1
kind: Deployment
metadata:
  name: nginx-proxy
spec:
  replicas: 3
  selector:
    matchLabels:
      name: nginx-proxy
  template:
    metadata:
      labels:
        name: nginx-proxy
    spec:
      containers:
      - name: nginx-proxy
        image: nginx:1.17.5
        ports:
        - containerPort: 80
With this manifest, the nginx-proxy Deployment is created with three replicated
Pods. the Pod template defines some metadata and the spec of each of the Pods
in this replica set. In this example, each Pod encapsulates one container that
is built from the nginx:1.17.5 image, exposing port 80. In this the Deployment,
each Pod and each container all have the same name “nginx-proxy”, but there is
no requirement to keep the same name for all these objects. More importantly,
Pod names have to be unique, and the name provided at
spec.template.metadata.labels.name is the prefix of the final name, which
contains a hash identifying the Pod and the ReplicaSet it belongs to.
A Deployment is an abstraction that represents a stateless application. As such, its Pods are indistinguishable from one another. Applications that need to maintain state are better served by the StatefulSet controller, which is similar to a Deployment in that multiple copies of a Pod are created from the same container spec, but with the difference that they have a stable network identity and persistent storage. Pods created by a StatefulSet have a predictable name, whereas those created by a Deployment have a semi-random name. For example, Redis and Elasticsearch clusters would be deployed using a StatefulSet configuration.
Finally, some less used controllers that are nonetheless important:
- DaemonSets ensure that a specific Pod is always running on all or a subset of nodes. If new nodes are added to the cluster, this controller will automatically schedule the Pod on those nodes with the required spec;
- the Job controller schedules one or more Pod required to run a task. When the task is completed, this controller terminates all these Pods — a common use-case for Jobs are database migrations;
- the CronJob controller acts like the Job controller, but runs according to a time-based schedule.
Services
Remember that Pods are created and destroyed dynamically. Although they can communicate using their assigned Pod IP addresses, these IP addresses are ephemeral. They’re not guaranteed to remain constant when Pods are restarted or when scaling up and down. A Service is a static IP address that represents a service or a function in your infrastructure. It’s a network abstraction for a set of Pods that deliver that service. These Pods are selected using a label selector. Here is an example of a Service:
apiVersion: v1
kind: Service
metadata:
  name: backend-app-service
spec:
  type: ClusterIP
  ports:
  - name: "80"
    port: 80
    targetPort: 8080
  selector:
    app: backend
This Service exposes an IP, from which it forwards all traffic it receives at
port 80 to port 8080 on the Pods that have a label app: backend.
There are a few different types of Services, and they build on top of each other. The default and simplest one is CusterIP, as in the example above. This type exposes the Service on a cluster-internal IP address. This is useful for exposing Services running inside the same cluster to each other.

app:
web
. The Service IP can be customized with the
clusterIP field.The type NodePort exposes the Service on each node’s IP at a static port, and can be used to access the Pods from outside the cluster. A ClusterIP Service, to which the NodePort Service routes, is automatically created.
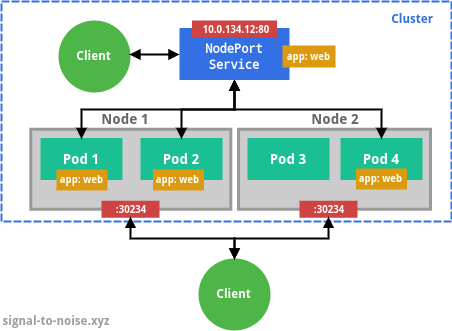
nodePort field. Traffic to this port is routed by
Kubernetes to the Service Pods, even if they are not on the same node that
receives the requests. Internally, the Service is also visible as a
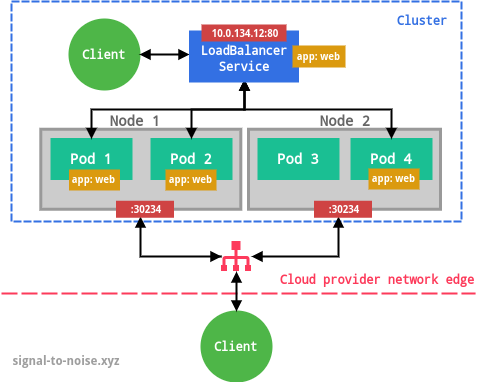
ClusterIP service.The type LoadBalancer exposes the Service externally using a cloud provider’s load balancer, e.g. Cloud Load Balancer on GCP or Elastic Load Balancing on AWS. Unless you run Kubernetes in a managed environment (like GKE), you will have to set up the load balancer manually. NodePort and ClusterIP Services, to which the external load balancer routes, are automatically created.
Ingresses
Typically, you use Services to expose your Pods inside or outside the cluster to other components of your architecture, but you don’t route HTTP(S) traffic to them directly. One exception to this are cloud load balancer, which can be configured to accept external traffic.
For HTTP(S) traffic, an Ingress offers more flexibility and features. It can be configured to load balance traffic, do SSL/TLS termination, or to implement name-based virtual hosting.
By itself, an Ingress only defines the configuration and has no additional effect. To fulfill it, you also need to deploy what is called an Ingress controller. At the time of writing, Kubernetes officially supports two: GCE and nginx.
As an example, here is a manifest file that defines an Ingress backed by nginx:
apiVersion: extensions/v1beta1
kind: Ingress
metadata:
  name: my-ingress
  annotations:
    kubernetes.io/ingress.class: nginx
spec:
  tls:
  - hosts:
    - web1.example.com
    secretName: letsencrypt-web1-certificate-secret
    - web2.example.com
    secretName: letsencrypt-web2-certificate-secret
  rules:
  - host: web1.example.com
    http:
      paths:
      - path: /
        backend:
          serviceName: web1
          servicePort: 80
  - host: web2.example.com
    http:
      paths:
      - path: /
        backend:
          serviceName: web2
          servicePort: 80
      - path: /api
        backend:
          serviceName: web2-api
          servicePort: 3002
This manifest files defines an Ingress that serves HTTPS traffic for
web1.example.com and web2.example.com. Traffic to the former host is entirely
routed to the service web1, whereas traffic to web2.example.com is routed to
the services web2 and web2-api depending on the path. These services don’t
need to be exposed, and they could be simple ClusterIP Services.
The tls object defines the certificate secrets. You could manually provide
them to Kubernetes or use a tool like
cert-manager, but that’s outside of
the scope of this simple overview.
Volumes
A container application can write data to the read-write layer inside the container, but that is ephemeral. So when the container terminates, whatever was written will be lost. Secondly, when running multiple containers inside a Pod, it is often needed to share files between them. A Kubernetes Volume is another abstraction that solves these problems. A Volume is simply a directory that is accessible to all the containers in a Pod. The requirements for a Volume are defined through its specification. It declares how the directory is created, what storage medium should be used, and its initial contents. However, Pods themselves are also ephemeral. A failing node or a deleted Pod could cause its Volumes to be deleted too. To avoid this, you can configure Volumes to use network-based storage that is not lost when a Pod or node fails.
An emptyDir volume is first created when a Pod is assigned to a Node, and exists as long as that Pod is running on that node. An emptyDir volume survives container crashes, because a Pod is not deleted if one of its container crashes. However, it is deleted if its Pod is unscheduled.
Example:
apiVersion: v1
kind: Pod
metadata:
  name: web
spec:
  containers:
  - image: nginx:1.17.5
    name: nginx
    volumeMounts:
    - mountPath: /cache
      name: cache-volume
  volumes:
  - name: cache-volume
    emptyDir: {}
A secret Volume is used to pass sensitive information to a Pod. The secret must exist before it can be mounted as a Volume (we’ll do this in part II of this series). These Volumes are backed by tmpfs and thus their contents are never written to disk.
For example, a secret Volume could be used to pass htpasswd-hashed data to
nginx. In the following example, the data stored in the HTPASSWD key of the
secret named htpasswd is mounted at /auth/htpasswd as read-only:
apiVersion: v1
kind: Pod
metadata:
  name: web
spec:
  containers:
  - image: nginx:1.17.5
    name: nginx
    volumeMounts:
    - mountPath: /auth
      name: htpasswd
      readOnly: true
  volumes:
  - name: htpasswd
    secret:
      secretName: htpasswd
      items:
      - key: HTPASSWD
        path: htpasswd
There are also some cloud provider-specific types like awsElasticBlockStore, azureDisk, or gcePersistentDisk that supply persistent, network-based storage. There are limitations, as usually you can use these only your Kubernetes cluster is running on one of these cloud providers. Moreover, these disks must already exist before the Volume is mounted.
As an example, after creating a GCE persistent disk with gcloud,
$ gcloud compute disks create --size 30GB --zone=us-east1-b static-data-disk
you can mount it in a Pod as follows:
apiVersion: v1
kind: Pod
metadata:
  name: web
spec:
  containers:
  - image: nginx:1.17.5
    name: nginx
    volumeMounts:
    - mountPath: /var/www/html
      name: static-data
  volumes:
  - name: static-data
    gcePersistentDisk:
      pdName: static-data-disk
      fsType: ext4
There are additional restrictions: the Pod must be running on a GCE VM, and this VM needs to be in the same GCP project and zone of the persistent disk.
Recap
- Kubernetes enforces the state you describe through manifest files;
- The desired state is abstracted by objects;
- Pods are managed directly by Kubernetes and they are ephemeral;
- Your application will be usually deployed with a Deployment or a StatefulSet configuration;
- Networking between components is defined by Services: ClusterIP for intra-cluster communication, NodePort and LoadBalancer if traffic comes from outside the cluster;
- HTTP(S) traffic is served through an Ingress, which only defines the configuration; the actual work is done by an Ingress controller like GCE or nginx.
- Persistence is achieved with the Volume abstraction – there are many different kinds depending on your use case.
Conclusion
This tutorial was meant to give the reader a basic understanding of the most important concepts of Kubernetes. Most of these will be put into practice in part II of this series, where we will deploy a very simple application backed by Redis.